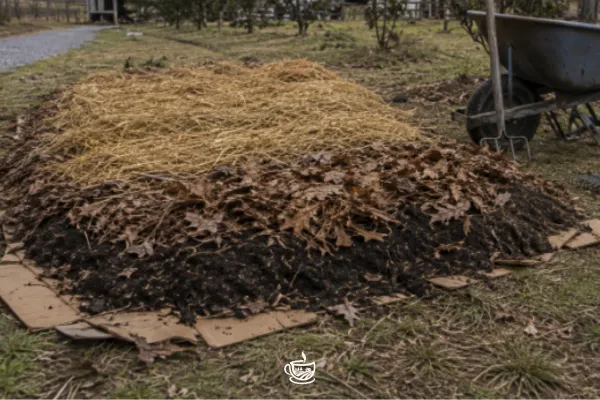
Building Beds with Lasagna Layering: A No-Dig Way to Start a Garden
Learn how to build a fertile garden bed over grass using cardboard, compost, leaves, and other materials—without tilling the soil.
Some garden beds begin with a shovel, a tiller, and a good deal of muttering.
Others begin with cardboard.
In Setting Up a No-Dig Garden in November After the Frost Date, I explained why fall/autumn is such a useful time to prepare a garden without turning the soil. This time, we are going deeper into the actual bed-building process: what goes into each layer, what should stay out, and how to keep your garden lasagna from becoming a soggy casserole.
Lasagna layering—also called sheet composting or sheet mulching—lets us build a garden bed from the ground up without first stripping away every blade of grass. Instead, we cover the existing vegetation and stack organic materials in layers, allowing moisture, soil organisms, and time to do much of the digging for us.
What Is Lasagna Layering in a Garden Bed?
Lasagna layering is a no-dig method of building a garden bed by covering existing vegetation with wet cardboard and adding layers of nitrogen-rich green materials and carbon-rich brown materials. As those materials decompose, they suppress weeds, recycle organic matter, and create a richer planting layer.
There are no noodles involved, which is probably for the best. The name simply describes the stacked layers.
The cardboard blocks sunlight from reaching the grass and many annual weeds. Above it, compostable materials gradually break down into lovely organic matter. This can reduce digging - YAY!, conserve moisture, and turn leaves, grass clippings, compost, and other farm leftovers into a usable bed.
Why Build a Bed This Way?
Bare soil rarely stays bare for long. Nature either covers it with plants or sends weeds to handle the vacancy.
Lasagna layering gives us a head start by covering the soil intentionally. It can be used to:
Create a new garden bed over lawn
Widen an existing border
Prepare the foundation for a fruit-tree guild
Improve an area that needs more organic matter
Put autumn leaves and garden trimmings back to work
It is especially useful in autumn, when leaves are plentiful and the bed can settle over winter before spring planting. The finished pile will shrink as it decomposes, so build it higher than the final bed you expect.
Around here, fallen leaves are not trash. They are next season’s soil wearing their autumn clothes.
How to Build a Lasagna-Layered Bed
1. Choose and mark the bed.
Select a site with the sunlight your intended plants need. Keep the bed narrow enough that you can reach the center without stepping into it. Compaction is not invited to this supper.
2. Cut the vegetation low.
Mow or trim the grass and weeds close to the ground. Remove persistent plants with deep or spreading roots, such as blackberry, bindweed, Bermuda grass, or nutsedge. Lasagna layering may weaken them, but some weeds consider cardboard a personal challenge.
3. Loosen severely compacted ground if necessary.
Use a garden fork or broadfork to create openings without turning the soil completely over. This can help air and water enter particularly stubborn dense ground.
4. Cover the area with cardboard.
Use plain brown corrugated cardboard. Remove tape, plastic labels, staples, and glossy sections first.
Overlap the cardboard edges by several inches so grass cannot find a bright little escape route (ask me how I know). Wet the cardboard thoroughly after placing it.
Do not pile on six layers simply because boxes are free. An excessively thick barrier can slow the movement of water and air into the soil below.
5. Add a nitrogen-rich green layer.
Add finished compost, aged manure, fresh grass clippings, green garden trimmings, or chopped non-seeding weeds.
Because cardboard is carbon-heavy, a nitrogen-rich layer helps balance the bed.
For more info about which garden weeds can be safely reused, see Turning Weeds into Compost Power.
6. Add a carbon-rich brown layer. Turning Weeds into Compost Power
Cover the green material with dried leaves, straw, shredded plain paper, or fine woody material.
Water lightly as you work. The layers should feel like a wrung-out sponge—not dusty dry and definitely not swampy.
7. Repeat the layers.
Continue alternating green and brown materials until the bed reaches the desired height. Finish with a brown layer to cover moist materials, reduce odors, and discourage flies.
For a bed near dogs, chickens, raccoons, or opossums, skip exposed kitchen scraps. A garden bed should not become the neighborhood buffet.
8. Finish according to your planting schedule.
For later planting, top the bed with leaves, straw, or wood chips and allow it to decompose for several months.
For immediate planting, add several inches of finished compost and garden soil on top. Place seedlings into pockets of finished material rather than directly into fresh, actively decomposing layers.
Pro tip: Before choosing the final covering, read Organic Mulches: Straw, Leaves, and Beyond. Straw, shredded leaves, compost, and wood chips do not all behave the same way.
What Belongs in Each Layer?
Green, Nitrogen-Rich Materials
Finished compost
Aged or properly composted manure
Fresh grass clippings applied thinly
Green plant trimmings
Chopped, non-seeding weeds
Coffee grounds mixed with other materials
Brown, Carbon-Rich Materials
Dried leaves
Clean straw
Shredded plain paper
Plain brown cardboard
Small amounts of untreated sawdust
Fine wood chips or shredded bark
What Should Stay Out?
Do not add:
Diseased plant material
Weeds covered in mature seeds
Persistent invasive roots
Chemically treated wood
Glossy or plastic-coated cardboard
Pet waste (we love our chickens, but they are not our “pets” :-( therefore their poop is ok. However, human waste is a no-no!)
Thick, slimy mats of grass clippings
Meat, dairy, or oily food scraps
More material is not always better. Sometimes it is simply heavier.
Let the Bed Settle and Teach You
A lasagna bed is not a once-and-done recipe.
Materials settle. Mulch thins. Earthworms arrive. Weeds test the edges because weeds are nothing if not optimistic.
Observe how quickly the bed drains, where it stays moist, and how much it sinks. Add material based on what the bed needs rather than automatically heaping on more compost each season.
Too much compost—especially manure-based compost—can lead to excessive nutrient levels. A soil test keeps enthusiasm from becoming an expensive soil problem.
Once the bed is ready, plant it densely enough to protect the surface. Groundcovers, flowers, herbs, vegetables, and future guild companions can help keep living roots below and useful cover above.
A Reflection from the Farm
Lasagna layering is not fast in the way machinery is fast. It is patient work.
You gather what the farm already has. You place one layer over another. Then you allow rain, fungi, earthworms, microbes, and time to continue what you started.
That can feel slower than tearing everything apart and rebuilding it in an afternoon. But the soil is not merely something we stand on while growing plants. It is a living community, and good stewardship sometimes looks less like conquering and more like covering, feeding, and waiting.
Lasagna layering turns cardboard, leaves, compost, and patient observation into a garden bed that protects the soil before it ever produces a harvest.
✅ Ready to Learn by Working Alongside Us?
➡️ Contact Clemson Tea Farm about classes or volunteer opportunities
➡️ Learn what it means to WWOOF at Clemson Tea Farm
We share what we are learning about soil-building, tea growing, regenerative practices, and farm stewardship through classes, volunteer work, and seasonal WWOOF stays.
Wanna Read More?
Wanna Geek Out?
Oregon State University Extension: Sheet Mulching and Lasagna Composting with Cardboard
Oregon State University Extension: Three Methods for No-Turn Cold Composting
#ClemsonTeaFarm #TeaLeavesAndLifeLessons #LasagnaGardening #SheetMulching #NoDigGarden #SoilHealth #RegenerativeGardening #GardenBeds #Composting #Zone7b #Zone8a
